

| Level: | Professional |
| Medium of instruction: | English |


|
- Do you wish an opportunity to work with producers, film directors, and cinematographers exploring and pooling your skills with your fellow filmmakers?
-
SRM Film School gives you a chance to make your own feature film. Learn about the traditional and new routes and techniques to getting a film made and released.
-
This film making course is designed to give students an industry-focused learning in the business and practice of modern low-budget feature making for fact or fiction
Why study feature filmmaking with us?
-
The course teaches you how modern filmmakers make feature length projects and offers practical experience of trying to make such projects. The collaborative nature of modern film making means that this is a course for students with aspirations as directors, producers, camera ops, editors etc. who would not want to develop both their aesthetic and business skills for a long successful career working on feature length documentaries or fiction films.
-
All students will complete with a wealth of professional contacts, a stunning show-reel, a fully developed feature film project and the knowledge and contacts how to get ahead in the film business.
-
The aim is that at the end of the course the students will have received a through education in the needs and techniques of the micro -budget film business and have the skills to be able to negotiate favorable terms for their current (and future feature projects) to be distributed.
Awards\Scholarships
-
There are a number of scholarships and cash awards for meritorious students, we know how important education is and we work every day and try to provide our students everything they need. SRM Film School award their meritorious student by funding to make you own feature films, we also support our top students with veteran Directors, Film/TV artist , editor, camera men, technicians, scriptwriter etc.
Teaching methods/quality excellence
-
This Master of Art is taught in an executive format of intensive workshops and seminars. Students will be based at SRM Film School Campus in Mumbai.
-
SRM Film School can offer you the latest editing software, lights and video cameras including Sony F3 and Canon DSLR 5D and 7D, together with first class tutorial and lecture rooms.
-
The modules in SRM Film School are taught by both practicing industry professionals and by specialist academic staff from the field of Film and Media Production, we do change faculties from time to time so our students could grab as much knowledge they could from multiple veterans.
Course Assessment
-
Students will be assessed through continuous assessment. Assessment tasks will be varied, including group presentations, script development evaluations, industry reports, production folders, marketing reports and feature film project.
-
Your final mark for the production module will reflect the quality of the final submission and amount of input you have put into the combined project either as a producer or director. Your tutors will evaluate your creative and physical input to the project and your course based on your journals, tutorials, other students’ submissions and any other submissions. In this sense a well-produced project can be awarded a distinction to the producer even if the director achieves a pass for his or her work.
Workshop modules
-
These are practical and creative filmmaking workshops, which will give students the techniques for feature film production for low budget film production. In workshop modules students will be taught by SRM veteran staff, with experience in documentary or drama production, and/or by industry professionals.
-
Context modules: Context modules are offered in the belief that filmmakers will only reap the rewards of their creative skills if they have an adequate understanding of the industry, the financial and legal frameworks and the operation of these systems. These are not modules that would be covered in an SRM Film Making Studies as they relate entirely to the business functions of the industry although you will investigate the power and dominance of the Bollywood studio system and its impact on narrative, for example. However you will then apply this knowledge to alternative funding models and tax regimes that Asian countries have adopted to combat Bollywood dominance.
-
Feature development workshops: There will be two script/development workshops and up to 4 hours 1.1 mentoring during this period. Students on the part-time route will have the opportunity to collaborate on productions being filmed by full-time students during this period.
-
Class: This double module is where theory and practice come together in the production and postproduction of a feature length project.
-
From Script to Screen – low budget production techniques: This module will introduce and explore practical and creative techniques, approaches and strategies of low budget feature documentary and fiction production. This gives an over view where key skills are developed building on students’ previous knowledge. Each student will refine their personal project during this module by learning advanced editorial, scripting, stylistic approaches to feature film production.
-
From Ground to Production - the international film business (Context): To compete in the global film business low budget practitioners will be required to understand the historical development business systems, procedures and models that influence the contemporary global film business. This model will allow filmmakers to understand how and why the Bollywood model dominates feature film production.
-
Planning for Success – pre-production: This module builds on the first two modules to give students the ability to further develop/rework/alter their main project in the light of the insights into low budget cinema techniques and how the international film business operates.
-
Finding an Audience – distribution techniques:This module will give the students a thorough grounding in the theory and practice of contemporary marketing theory and practice as applied to film. The module will introduce traditional marketing theories and strategies on marketing communications, consumer behavior, direct marketing and customer relationship marketing. It will then update these approaches with a focus on digital marketing techniques that use social networks to build networks of advocates prior to release that can produce a marketing momentum that allows low budget films to compete against Bollywood blockbuster marketing clout.
-
Production & Postproduction: This module is the conclusion of the previous four modules. In this 24 week module students will turn their projects into a feature length production, building on the insights they have learnt over the course. The projects will normally need to be completed to an ‘off-line’ standard with a stereo mix.
-
Students should expect to work 6-8 hour days for 5 days a week when filming and editing. It is expected that most productions will involve 4-6 week for basic photography.
-
The projects will then go into a period of editing of multiple weeks to arrive at a version of the film that is suitable for screening to distributors and agencies to seek further completion funding.
We cover five main stages:
Development
Pre-production
Production
Post-production
Distribution
Development
-
Concept
-
Rewriting
-
Synopsis
-
Certification
-
Funding and budgeting
-
Grants
-
Copyright
-
Discussion
-
Screenplay Format
-
Logline
-
Low Budget Writing
-
"Elements"
-
Pitching
-
Writing
-
Treatment
-
Pitching
-
Protecting Your Ideas
-
Funding Plans
-
Contracts and law
Development is the first step. As you can see from the above points, it is one of the longest phases of a project and for good reason. This is the first phase of the film making process. The producer will usually be the most heavily involved person in this phase. During development, you are finding material either by creating an original script by working with a writer (you could also be the writer), or discovering someone else’s material and optioning it. Either way, you are attaining owner ship in the material. Too many times, moviemakers move forward with projects without giving adequate thought to why they are making the project, what they hope to accomplish and how it will actually work. The more time you invest in development, the higher the likelihood will be that you will get the end result you are looking for. A big part of this process involves working with writer to generate a script that you are happy with. This is one of the most difficult but most important skills to acquire as a producer.
Many projects never make it out of development and for very good reason. One should never produce every single concept that pops into their head. Each one merits careful consideration. Is it a fully formed idea? What are the flaws with it? How important is it to you? Will it work as a movie? You should go through this process with each concept before you even begin writing a script.
Pre-Production
-
Overview
-
Acquiring film stock
-
Location Scouting
-
Paperwork
-
Release Form
-
Cast Contract
-
Budgeting and Scheduling
-
Storyboarding
-
Funding contents
-
Call Sheet
-
Legal
-
Release Form
-
Pre-production
-
Casting Directors
-
Scheduling contents
-
Scene Breakdown
-
Crew Contract
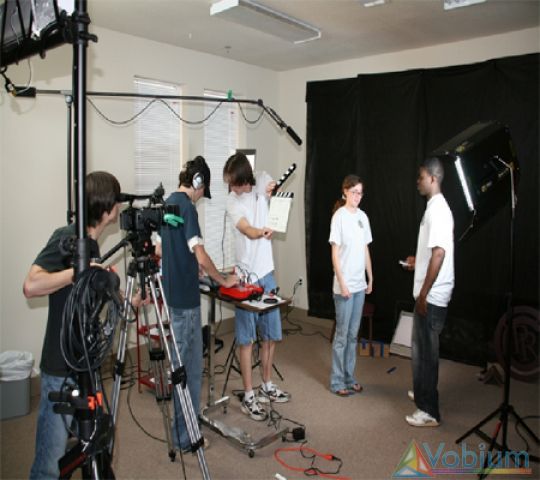
This is the second phase of the film making process. You engage in this phase once you have secured financing for your film. The main objective of this task is to assemble your team, and secure your locations. The first thing you want to do is hire your director. This is crucial. Your director will basically be the man in charge of all creative decisions in your film. You want to find someone who is capable, likable, and shares the same vision as you. Once you find your director, you need to hire your casting director. Have him/her start searching for and narrowing down the actors to approximately 5-10 for each major role. While your casting director is doing that you will assemble your crew. Of course, every crew member is important, but if you had to narrow your crew down to the top five most important people, most directors would say: DP, Production Designer, Editor, Script Supervisor, and First AD.
Pre-production is a fairly loose term which refers to the tasks undertaken before production begins. Exactly what is included in this stage depends on the medium and situation.
For a small video company, pre-production may refer to everything that happens before shooting begins, for example, meeting with the client, research, storyboarding, location planning, etc.
For feature films, pre-production is more specific and only begins when other milestones have been met such as financing, screenplay, casting and major staffing. The more experienced the moviemaker, the more time and energy they will invest in pre-production. This is the preparation phase of the project. Every scene, every shot, every logistical detail is planned out. It is impossible to anticipate everything that might happen, and improvisation will be required in production but the more variables you can eliminate in pre-production, the more creative freedom you will have in production.
It may sound counter intuitive that detailed planning would lead to creative freedom. However, consider this: if you have to deal with unexpected and mundane details during production, it robs you of time and cripples your ability to create. Time is a luxury and you do not want to waste it, especially when you have all those resources and talent gathered together to realize your creative vision. You will make good use of that time if you prepare. You will waste that time on frustrating and avoidable obstacles if you do not. Give yourself the best chance possible by preparing.
Production
-
Technical
-
The Camera Crew
-
Filtration
-
Microphones
-
Actors
-
Power Sources
-
Directing
-
Shooting Styles
-
Directing Actors
-
Cinematography
-
Moving the Camera
-
Aspect Ratio
-
Recording Devices
-
Blocking
-
Stills Photography
-
Managing the set
-
Clapper Board
-
Keeping the crew happy
So what do our students learn in Pre-Production?
Idea or Concept should be decided on which, film has to be made. It is the main content or message which has to be conveyed to viewers.
-
Theme is the basic outline prepared by using already confirmed idea or concept
-
Synopsis is the description of theme. It is also called as Story.
-
Background should be decided on which story has to run.
-
Single line order preparation which is the order/sequence of different incidents takes place in the story
-
Writing of Screen-Play consists of different number of Scenes. The single line order of the story will be developed as Scenes for convenience of presenting on the screen. Finally Screen Play is the conversion of Story for convenience of playing on screen. Each and every scene must have the purpose.
-
Script is the Screen-Play with Dialogues. It is better to maintain economy while writing Dialogues. Short dialogues are better than lengthy Dialogues.
-
Preparing estimation of Rough Budget in line with Script
-
Convincing and Confirming Producer
-
Casting, that is process of selection of artists for the different characters in all scenes.
-
Selection of suitable Cameraman/Cinematographer/Director of Photography
-
Selection of Action Director/Fight Master, Choreographer, Art Director, Costumer, Make-up man, Lyrics Writer, Music Director Production Manager
-
Writing of Lyrics by Lyrics writer
-
Music composition to Lyrics by Music Director
-
Songs recording
-
Preparation of Scene wise Characters list and character wise scenes list
-
Preparation of Costumes List of every character in every scene
-
Details of Make-Up for each and every character in every scene
-
Hand and set Properties List as per every scene
-
Arranging of hand and set Properties
-
Selection of Locations and designing of sets according to script
-
Lighting Schemes to be decided/designed by Cinematographer/Director of Photography with co-ordination of Director and Gaffer/Chief Electrician
-
Designing of Fighting Schemes
-
Deciding of Song Schemes
-
Costumer or Costumes Chief sits along with the Director, Camera man, art director, Producer, Costumes Designer and will decide or design the costumes as per the Costumes chart already prepared.
-
Make-Up Chief sits along with Director and will do Make-Up designs according to the Make-Up chart already prepared.
-
Completing FDC formalities
-
Taking of call sheets from Artists
-
Schedule planning as per the available dates of Locations, Artists and all technicians
-
Booking of Unit/Cine Services and confirmation of availability of all the equipment needed as per the script.
5 Points to be remembered or considered during scenes development
-
Who’s Scene with whom
-
What will be the subject or topic or content which has to be discussed in the scene
-
Where that is location or place, the scene will be occurred
-
When the scene is going to be occur that is time Ex : Morning, afternoon, night etc.
-
Why,Purpose or Reason of the scene.
Types Characters'
-
Major Characters – main/lead role in the story
-
Minor Characters – these are also roles includes in the story but are minor roles
-
Supporting Characters – characters supports the main characters for running of story
-
Atmosphere characters are for crating atmosphere in particular scene
-
Characters for specific purpose
FDC Formalities
-
Banner registration
-
Title registration
-
Director membership
-
Producer membership
-
Story copy right from writers association
Schedule Planning is the planning for shooting according to the available dates of Artists and locations. This Schedule planning depends upon the preparation of Scene wise Characters chart/Artists chart, Character wise Casting chart, Characters Combination Chart and Locations chart. After deciding number of Scenes to be shot for every day, number of days to be taken for ever Artist and Location has to be calculated. According to the available dates of Artists and Locations, different number of Schedules with Artists and Locations has to be planned.
Production
Production is one of the stages of Film Making.
Points to keep in mind during the stage of shooting part.
-
Blocking
-
Shot Composition Rules
-
180 degree rule
-
Aesthetics
-
Continuities
-
The rule of thirds
-
Clap Board
-
Editing Report and Call Sheet
-
Cinematography
Blocking
It is the fixation of movement and positioning of actors/objects in the frame. In the Blocking, position of Actors, properties, background material and movement of the actors will be decided for the proper dramatic effect and to ensure sight lines for the audience. Direction department should note the actors' positions, movement of actors for maintaining shot to shot continuity perfectly. The camera movement also needs to consider as part of the blocking process
Shot Composition Rules
-
There is no any rule for shot composition. But with a good reason, we can break any rule.
-
Entire screen should be filled with important subject matter. Empty space is wasted space.
-
Avoid tilted horizontal and vertical lines.
-
Movement or bright lights in the background are distracting.
-
Avoid the background by moving the camera or the object, if there is any problem like burning. If not, it will be worse for audience.
-
Place the eyes of subject one-third down from the top of the frame (In any type of shot).
-
Avoid big spaces between people or objects. Shoot people in full or three-quarter profile to let viewers see both eyes
-
By placing objects in foreground, middle ground and background, illusion of depth will be created.
-
To adjust focus, zoom in to full telephoto.
Crossing the Line / Reverse Cut / 180 Degree Rule:
Whenever taking of first shot completed, line of action will be established in view of the viewer. Line of action is the 1800 imaginary line in front of the camera where the action is going on. Once the line of action is established, camera should not be placed on the other side of the line of action. In the same scene, remaining shots should be taken from the sane side of Line of Action from which side first shot was taken. Crossing the line changes the viewer's perspective and there will be confusion like changing positions and reversing of actions. Crossing the line is also called as reverse cut. If it is essential to show the action from other side after establishing of 1800 line, camera should travel to other side while taking shot only. Then view point of the viewer also changes. From this shot onwards, remaining shots should be taken from that side only.
Aesthetics
Fundamentals to be known by directors
-
Composition
-
Picturisation
-
Movement
-
Rhythm
-
Style
Composition is the composing of actors, articles and Background material in an order/ respective position in the frame.
Internal elements of Composition
Line: Joining two points called as line. Joining two points in shortest distance is straight line. Line creates an illusion. Different ways of positioning of the Artists and their resulting effects like creation of illusions are as follows.
-
Horizontal line indicates strength or stability and it also establishes distance
-
Vertical line establishes height
-
Diagonal line indicates direction
-
Curved line indicates or creates movement
-
Zigzag line creates or indicates confusion
-
Spiral line indicates continuity
Mass: Area covered by one object or number of objects
Color: Colors of the actors that is costumes colors, Background colors in a frame and properties
Texture: Outer surface of the object is called texture or feeling of touch shall be created by visualization
External elements of Composition
-
Emphasis
-
Stability
-
Balance
-
Sequence
Emphasis: Highlighting of particular object/Artist or arrangement of artists or objects positions and places in a frame. Emphasis will be created indirectly in different ways
-
By place or position or superior and subordinate emphasis or triangular emphasis
-
By height or level
-
By contrast
-
By attention
-
By elimination
-
Off Screen emphasis
Technical emphasis:
-
Zoom creates emphasis (Either Zoom in or Zoom out)
-
Close shots creates emphasis
-
Lighting creates emphasis
Continuities
Direction department should take care for maintaining the following mentioned continuities while shooting.
Set: All articles should be in the same position in any shot
Light: Angle of Light, Direction of Light should be same in every shot or scene
Make-Up: Scene to Scene, within the scene (Shot to shot)
Costume: Scene to scene and shot to shot
Action: Physical or Body Continuity like leg, hand or any body parts movement continuity should be maintained
Emotion: Scene to scene and shot to shot should maintained.
Camera: Even though camera position and shot changed, objects position should not vary
matching the looks: Left look, right look or any look of actors should have continuity in every shot
Properties : Hand and set properties like spectacles, pens etc. continuity
The Rule of Thirds
This one of the compositional rules of photography, in which, image in the frame can be divided into nine equal imaginary sections/parts by two equal spaced horizontal lines and two equally spaced vertical lines as shown in the following examples. Then, four reference points will be created which are useful for composing the image in the frame. If shot composes as per this rule, more tension, energy and interest will be created better than when shot composes simply by centering the feature/subject. Points or lines of interest of Viewers should occur at 1/3 or 2/3 of the way up (or across) the frame than center.
Clap Board
Clap Board will be used at the beginning of the pasteurization of each and every shot.
After clapping the board, the following sequence of dialogues has to tell with loud voice by Clap Board assistant for recording.
Scene no: 16, Shot No: 2, take no: 3 (16/2 take 3, if insert shot 16/insert shot take 3)
Clap Board operation is most useful for editing
Cinematography
-
Camera Angles
-
Types of Shots
-
Camera Movements
-
Film Lighting
Camera Angles
Eye level: object shown as it is as the camera lenses parallel to object eye.
Top angle/ Bird’s Eye : The scene is shown from directly above. It shows the object and it’s surrounding details also. This is a completely different and somewhat unnatural point of view which can be used for dramatic effect or for showing a different spatial perspective. In drama it can be used to show the positions and motions of different characters and objects, enabling the viewer to see things the characters can't. This view is very useful in sports, documentaries etc.
Low angle: shows the subject from below, giving them the impression of being more powerful or dominant. With this angle, shows object as superior.
Bottom angle : View of the object/subject from bottom side.
High angle shows the object from above, i.e. the camera is angled down towards the subject. This results the effect of diminishing the object, making them appear less powerful, less significant or even submissive. In this angle, object shows as inferior.
Dutch Tilt is also a camera angle, in which camera slanted to one side. This angle uses for dramatic effect and helps portray unease, disorientation, frantic or desperate action, intoxication, madness, etc. The Dutch tilt is also known as a Dutch angle, Dutch tilt, Slanted, German angle, oblique angle or canted angle.
Pickup Shots: are the special shots without actors i.e. close ups of properties, not recognizable shots of actors in different angles. These shots will be useful for compensating editing/continuity problems. Pickup shots will be taken after taking of main shots in the scene.
Depth of Field is the field which is in focus. It is the distance in focus which is in front of the object and beyond the object. In case of the close, Object is the starting point of the Depth of the field.
Connective shot: Shot for connection of Back ground and other ground by using trolley
Editing Report / Call sheet
Editing Report is the clap after shooting of shot and will be used in the following situations
At the time of emergency where the roll or can or film in the camera is about to complete or is about to exhausted
At the end of Extreme long shot
End clap should be clapped reversely. If End clap used in the shot, should be mentioned in the script
1. Editing Report: To be written for each and every shot during production. In the case of end clap, below the production, banner, title, end clap should be written in red mark. For TV, Tape count recorder (TCR) shot ending time. The following table is the format of editing report.
|
Editing Report |
||||
|
Banner/Production : |
||||
|
Title : |
||||
|
Scene Number: |
Shot Number: |
Gist: |
Location |
|
|
Day/Night |
Int/Ext |
TLK/SIL/PLB* |
Date of Exposition |
|
|
Can Number: |
Audio Number: |
OK Take: |
If End Clap : |
|
|
* TLK – Talky, SIL – Silent, PLB – Play Back |
||||
|
Remarks if any : |
||||
Call sheet chart during production/shooting
Date :
|
S.No |
Scene no. |
Location |
Gist |
Character |
Artist |
Call sheet |
|
|
In time |
Out time |
||||||
|
|
|
|
|
|
|
|
|
Types of Shots
Extreme close up/Big Close up (ECU) is for showing extreme details of the object. There must be a specific reason to use this close. It is too close to show general reactions or emotion except in very dramatic scenes. The following images are the examples of this close up.
Medium Close up shows the face or main part of the object more clearly, without getting uncomfortably close. It shows the face and body more clearly. The following image is the example of this medium close up.
Full Closeup will be from top of the head to end of the neck. The following images are the examples of this full close up
Wide Close up shows up to the shoulders. Wide Close up shot is for showing certain feature or part of the subject in most of the frame. A close of a person usually means a close up of their face. Close-ups are obviously useful for showing detail and can also be used as a cut in. A close-up of a person emphasizes their emotional state.
Medium shot shows some part of the subject in more detail, whilst still showing enough for the audience to feel as if they were looking at the whole subject. In this shot, object will be having more importance than environment. The following images are the examples of this medium shot.
Medium full shot will be up to knees. The following images are the examples of this medium full shot.
Full Shot shows the whole height of the person. It doesn't show as much background as the VLS but it does show enough to know the subject's location. This shot gives equal importance to environment and object. The following images are the examples of this long shot.
Extreme long shot shows "geography" to the viewer. It will be clear that the place where the people are. This shot gives main importance to the environment only. The following images are the examples of this extreme long shot.
Aerial Shot usually will be done with a crane or from helicopter to view large landscapes or any large areas. This type of shot would be restricted to exterior locations only. The following images are the examples of this aerial shot.
Over the Shoulder Shot (OSS) is the view from behind a person at the subject, cutting off the frame just behind the ear. The person facing the subject should occupy about 1/3 of the frame. This shot helps to establish the positions of each person, and get the feel of looking at one person from the other's point of view. A variation of this shot can be a bit wider and include the shoulder of the person facing the subject. The following images are the examples of this suggestion shot.
Point-of-View Shot (POV) is a view from the subject's perspective. The following images are the examples of this POV.
Cut-away is a shot which shows something other than the current action. It could be a different subject. The cutaway is used as a "buffer" between shots or to add interest/information. Cut-In Like a cutaway, but specifically refers to showing some part of the subject in detail.
Insert Shot with different facial expressions of the artists and with various camera angles will be taken sometimes if necessary for inserting in between any two shots.
Opening the window of the camera: Shot opens at back side of the object and object moves front.
Closing Window of Camera: camera moves close to the object & closes lens at chest.
Counter action shot: It is the shot which takes reaction of actors for action of another actor.
Camera Movements
Camera movement when fixed on Tripod
Trucking Shot : is basically the same as tracking or dollying. Although it means slightly different things to different people, it generally refers to side-to-side camera movement with respect to the action.
PAN: Left or right Horizontal movement of the camera is called as PAN. PAN right regarding camera and PAN left regarding camera are the two kinds in PAN. This PAN is for establishing distance between two objects, relationship and for showing number of people and particular object movement.
Viz Pan: Sudden panning between two objects is the Viz Pan
Object pan left or right: i.e. PAN of the Camera when object moves left or right.
Cross pan: is the panning of camera to follow the object movement when movement of both camera and object is reverse.
Tilt: Vertical movement (Up or Down) of the camera is called as Tilt. Tilt up regarding camera and Tilt down regarding camera are the two kinds in Tilt. This tilt will be used for showing height, climbing up & down of the object.
Diagonal movement: It is the combination of PAN and Tilt. Camera moving horizontally and vertically at the same time results the diagonal movement. It will be used for showing height and distance of the object.
Zoom: Creating illusion of moving closer or further away from the action by varying/changing the focal length. Zoom In and Zoom out are the two types in Zoom. These two are for showing relationship between the object and the area. Zooming is an easy-to-use but hard-to-get-right feature of most cameras.
Zoom out: is to establish the place of the object
Zoom in: feels like object moves close to camera and is to establish the place of object in between so many objects.
Camera Movements - Without Tripod
Movement of Camera when Object is fixed
Pedestal shot: If camera fixed on pedestal and whole camera moves vertically i.e. up down with regards to object, then that shot is called as pedestal shot.
Follow Shot: The camera follows the subject or action. The movement of camera can be achieved by tracking or dollying. Steady-cam also used for movement of the camera in case of follow shot.
Steady-cam: is the camera which can be fixed to the body of the cameraman. Steadycam shall be used to follow any movement of the object. Following are the steadycams.
Tracking Shot is a shot in which the camera is mounted on a cart
which travels along tracks. In this tracking camera movement will be parallel to the action or at least at a constant distance
Trolley in or Track in: Camera moves towards the object
Trolley out or Track out: Camera moves far from the object
Trolley right or Trolley left: It is also called as Parallel trolley. Camera moves parallel to the object when object moves left or right
Crabbing Shot: Crabe Trolley will be used for this shot. Crabe Trolley will be like wheel chair for any movement. Tracking or trucking and dollying all are the Crabbing shots. Whenever camera moves “in and out” or “side to side at constant distance” regarding the subject, it is the crabbing shot.
Dolly shot or Round trolley shot: Whenever camera travels along the track, then that is the dolly shot. . A dolly shot is also called as tracking shot or trucking shot. Somebody defines, dolly as “in and out movement of the camera (closer/further away from the object),” and tracking as “side-to-side movement of the camera”. Generally Dollies are operated by a dolly grip. Whenever crane is mounted on dolly and camera is tracking and moving vertically, then that is a compound shot.
Dolly Zoom: Whenever camera moves closer or further from the object while simultaneously adjusting the zoom angle to keep the subject the same size in the frame, it is Dolly Zoom. Dolly Zoom is a cinematic technique in which results effect is that the subject appears stationary and the size of the background will be changed. This is called as perspective distortion. The effect results from Dolly zoom is an unnatural effect. While tracking, if the camera moves closer to the subject, the background will grow and dominates. If the camera is moving further away from the subject, the foreground of the subject will be dominated. This effect is emotional and it will be used to convey sudden realization and for reaction to a dramatic event.
Arc Shot: An arc shot is a camera movement in arc shape around the subject. It is like Tracking shot. An arc is a segment of the circumference of a circle. An arc shot will be taken by using arc shape track or arc shot results when camera tracking and dollying at the same time.
Crane shot is for any movement like pan, tilt, trolley. By using the crane, camera can move up and down that is the variation of the height of the camera. Total camera will move. The following image is the crane along with the trolley and weights fixed one side. Weights for easy “up and down” movement of the camera manually. Weights will be fixed as per the weight of the camera man and camera fixed on crane. Trolley fixed to the crane is for front and back movement of the crane.
Combination Movement -Both camera and object will move
-
Both in B) Both out
C) Both parallel in
D) Follow movement– Camera follows the object
E) Back movement: Object follows the camera
F) Crossing each other
Both in round direction: Dolly in – camera in and object out, Dolly out – camera out and object in.
Lighting
Fundamentals of Lighting
Purpose of Lighting: To get a proper exposure in order to improve picture quality
-
Illumination
-
Mood creation – according to scene, romantic etc, colour lighting schemes
-
Atmosphere creation
-
Illusion
-
Time & place establishment
-
Emotions
-
Effects
Lighting Scheme will be changed according to the following
-
Camera
-
Set
-
Costume
-
Location
-
Make-up
Natural lighting:Sun light
Artificial lighting: Lighting with the help of lamps
Direct light/Incident Light is the light directly from light sources like lamps, sun etc
Bounce light/Reflected Light is the Light after reflected/bounced off from a surface. It is effective than direct light.
Ambient Light: is the light already available in the atmosphere before additional lighting is added in a shot.
Hard Light: Directly from a source such as the sun, traveling undisturbed onto the subject being lit.
Soft Light: appears to "wrap around" the subject to some degree. It produces less shadows or softer shadows.
Spot is a narrowly focused beam of light which can be controlled
Lighting Equipment
Reflector is a specially designed reflective board/surface. It will be used as a secondary light source. Main source of light will reach the reflector board and reflects on to the subject to illuminate. This reflected light is also called as bounced light. The board is lightweight, flexible and can be folded up for transport. Nicotine or white coating will be used on Board for enhancing source of light.
Cutter:Black sheet for stopping or cutting any light
Filter:For decreasing intensity of the light or for getting soft light. The following are the different type of filters.
-
colour papers or gelatin sheets
-
Mesh
-
Glass
-
Better paper
-
Skimmer
Skimmer – synthetic cloth, as filter also used
Thermo coal :very small, as reflector for soft light max for close up shots
Dimmer :can be connected to light, for variation of intensity of light
Ballast is a device used to control the electrical current in a light.
Light meter is a tool used to measure light and indicate the ideal exposure setting. It is also known as an exposure meter.
Gels are the materials which are placed in front of a light source to change its characteristics.
Spectrometer is an instrument which measures the spectrum of light. Spectrometer analyses the electromagnetic spectrum and measures the intensity of radiation as a function of wavelength.
Stands and Clamps are the systems used to support lights and hold them in the correct position.
Bulb: Tungsten, Mercury, Halogens (Flood lights), Par light (for long distance lighting) are the different type of Bulbs. Voltage range of Bulbs is 500V to 10000V (0.5KV to 10KV).
Iron protector:Surrounding part of the reflector
Adjusting Lever :Adjusts the distance between light & lens
Brandoor for varying the quantity of light by opening or closing the doors
Lens is an optical device which transmits and refracts the light which may be concentrating or diverging beam. Three types of lenses
Convex lens or PC lens (plaino convex lens) : This lens gives sharp edged, hard & bright light and light will concentrate on object, Concave lens also gives sharp edged, hard and bright light but light diverges/spills to wide area.
Fresnel lens gives soft edged light and spreads light like zigzag.
Lighting Procedure
Lights may be arranged according to the Shot, location and time. Location & Time shall be segregated as follows
Day/Exterior: Maximum only reflected sunlight shall be used as it can be controlled and it avoids shadows. Reflectors for reflecting sunlight and skimmers for decreasing the intensity of the light will be used.
Day/Interior: External lighting (Sun light throw windows) effect shall be used for natural effect.
Night/Exterior: Blue filters for lights shall be used for getting Night effect
Night/Interior: For external light effect (Moon light effect), Blue filters shall be used, for internal lighting effect, basic lighting technique shall be used.
Lighting should be done according to the following
-
Distance between object and light
-
Background
-
Capacity and intensity of the light
-
Type of light
-
Type of lens/filter
-
Angle of light
In the Three Point Lighting Technique, three lights shall be used the key light, fill light and back light. If fourth light is available, then that can be used to light the background of the entire shot.
Key Light is the main light, which is strongest and provides most of the illumination and contrast on the subject. It is placed to one side of the camera/subject so that one side is well lit and the other side shall have some shadow.
Fill light is the secondary light balances the key light, lifts the light level and reduces the effects of shadows created by Key light. Fill light is softer and less bright than key light. Too strong fill light creates double shadows. Fill light shall be placed on the opposite side of the key light.
Back Light adds a rim of light to the hair and shoulders and creates depth (provide three-dimensional look) by separating or isolating the subject from the background. Light may be soft or hard depending on the effect intended. This light shall be placed at the back side of the subject/object and may be above the subject to light from rear.
The Background light is to illuminate the area behind the subject but a lower level than the foreground
Counter light: If possible/available more lights, counter lights shall be placed behind the object reverse to the Background light. These counter lights shall vary the distance between the background and the object.
Lighting Effects / Effects with Artificial Lighting
Cold/Warm: The feeling of coldness or warmth by using additional filters or doubling up on gels shall be created. Very blue means very cold, very red/orange means very hot.
Moon Light/Night time Light: By lowering the exposure slightly and adding a blue filter to the camera, Daytime seems like night. But, strictly need to avoid birds flying in the sky, any other lighting which should appear in shot, such as house or street lights.
Fire Light: To light a person's face who is looking at a fire, point a redhead with orange gel away from the subject at a large reflector which reflects the light back at the subject. Shake the reflector to simulate firelight.
Watching TV: To light a person's who is watching TV, shine a blue light at the subject and wave a piece of cloth or paper in front of the light to simulate flickering.
Rain effect: By using fan and light, rain effect out of window shall be created
Silhouette effect/shadow outline effect: Back light to the subject shall be crated Silhouette effect
Also Lighting shall create the Water effect, Fire effect, Smoke, Strobe effect, disco light effect, thunder effect and Stars-moon/mirror ball effect.
Post Production
Post-Production is one of the stages of Film Making. It is the stage after shooting part/production.
Sequence of different stages in Post-Production:
-
Developing the film
-
Rushes – screening of unedited version
-
Patch work if need
-
Rough editing
-
Final editing
-
Dubbing
-
Music posting/Re recording
-
Mixing (Mixing of all tracks)
-
First copy
-
Censor Formalities
-
Distribution
-
Publicity
-
Screening
-
Editing
-
Dubbing
-
Music
-
Songs
-
Sound
-
Censor Copy
Editing
Essentiality editing is selecting and coordinating one shot with the next to construct a sequence of shots which form a logical and impressive narrative. Through editing, the material you have shot will be blended together to form a convincing and good presentation
Editing begins with sorting through the available material
-
selecting the required shots
-
Deciding on the order and duration of each shot
-
Deciding on the cutting point (when one shot is to end and the next to begin)
-
Deciding the type of transition between shots
Editing Techniques
Cutting from one shot to another or from one point in time to another is a perfectly acceptable transition. There are some important transition effects which are useful in joining of different shots resulting in to a good and effective out put. 90% shots combination, will be with “cut”
Cut to: Cut is the most direct and frequently used method of getting from one shot to another. A cut happens instantaneously. It simply means one picture ends and another begins.
Jump cut occurs when two extremely similar shots are edited together. Cutting between similar shots of the subject from slightly different viewpoints can create a twist on the cut. There will be no relation between two shots
Match cut will be used if there is relation between two shots. In the case of subject match cut, subject will be same in two shots. In the case of Object match cut, subject changes and object will be the same in two shots.
Match cut will be useful in the following situations.
-
Mismatched camera height
-
Changes in head room
-
Action continuity
Cut away: one of the easiest ways around mismatched action or dialogues mistakes. There will be no relation between two shots.
Fade: Fade in is simply cutting from a dark screen to a full bright picture. It will be used at starting of the scene.
Fade out is a gradual reduction in the strength of the picture (Bright) to dark screen. It will be used at the ending of the sequence or scene
Wipe is a transition from one picture to another using a pattern, such as a vertical bar that moves across the screen. The pattern reveals the new picture as the old one is wiped away. Wipe comes in different shapes and sizes. For showing lapse of time, other screen will come on to the present screen by cleaning
Dissolve to & Dissolve from: A dissolve is two fades; one picture is fading in while the other picture is fading out. When this happens on screen, it causes an overlapping visual effect. It is meant to suggest a passage of time or a major change of location.
Super impositionis an effect produced by fading out one picture while fading in another. If the mixing of those pictures is stopped half way, the result is a super imposition. Matching of two different shots ex: Horse movement in air
Adding & deleting the frames in between the shot: It is the process of eliminating of some of the frames in the shot to increase the time duration there by giving the effective output. For fast motion or slow motion.
Blend: It is the process of conversion of one picture to another in the same frame. changing from one object to anther object ex: man changes to animal
Crew involved in Editing:
-
Editor and Assistant Editor during Rough Editing
-
Director or Co-Director and Editor during final editing i.e. for finishing with transition effects
Dubbing
Loop Dubbing was used for old movies. Loop is a closed circuit. In this type of Dubbing all the artists involved in the shot (for which they are dubbing) were to be present at a time and continue the process of Dubbing one by one. If any one makes mistake then the total process of Dubbing must be repeated from the beginning. It was very hard and time consuming.
Track Dubbing or Computerized Dubbing: There will be separate Tracks for each and every artist. After dubbing process and lip sinks are completed by all the Artists, all the tracks will be mixed according to the script. Track dubbing is easier than loop dubbing.
Lip Sink and Emotional sink: The lip movement of the Dubbing Artist should be match to the lip movement of the acted artist. The emotions shown by the acted artists should match to the emotions while dubbing.
Precautions to be taken by the Dubbing Artist
Air Bubble: maintaining some distance between mouth & microphone will avoid air bubbles
Lip Sound: At starting of every dialogue, lips should be keeping wet to avoid lip sound.
Microphone sound: By keeping himself aside from the micro phone, an artist can avoid micro phone sound.
Music
Because of “at points of high dramatic interests prose turns to lyric or song”. “Music is an element of Film Composition”
Crew involved at the time of Music:
Lyric Writer, Music Director, Director, Producer & Main character artist if popular
Music has two parts
-
Background Music
-
Songs
Six types of BG music
-
Recorded music
-
Live music
-
Recorded sound effects
-
Live sound
-
Human voice
-
Silence
BG Score used in films as
-
Curtain riser music: for Particular banner or particular subject
-
Character music: Music related to particular character
-
Signature music: for identification purpose
-
Caricature music: for establishing a particular character or character identification.
-
Comment music: for establishing characteristics of character (used for comedy situations)
-
Fill music: for filling up of gap between scenes
-
Mood music: for creating mood to viewers
-
Bridge music: for filling up of Gaps between any two scenes or situations or emotions. It will be fadeout after particular scene.
-
Transition music: It is like Bridge music but it will translate to another scene according to it.
-
Theme music: very important for any film. It will be repeated frequently throughout the film for establishing the message or story of the film.
-
Objective Music: Showing one place/any object with the help of music
-
Subjective music: Human emotions showing with the help of music
Songs
Four types of songs
-
Montage songs – montage means a series of action in small bits
-
Situational songs
-
Duet songs
-
Solo songs
Any song has its own rhythm and tune.
Choreography
-
Solo - a) solo single b) solo with group
-
Duet
-
Situation
-
Montague
-
Item songs
Background song comes in background may be by characters or may not by characters
BGM/Bridge music: Music between two charanalu
Parts of song/sequence of song
-
Lead music (optional)
-
Lead saki – only voice without meaning (optional)
-
Pallavi – starting lead of the song – compulsory – repeated
-
BGM1(Bridge music) – Optional
-
Anu pallavi – Optional
-
BGM2 – compulsory – in between charanam & pallavi
-
Charanam – compulsory
-
BGM
-
Pallavi – repetition
-
Charanam 2
-
Pallavi repeat
-
BGM or end music
-
Charanam optional
Sound
-
On screen sound
-
Off screen sound
Above two types of sound again divided
-
Human speech
-
Sound Effects/Effects sound
-
Music silence
-
Combination of human speech and effect sounds
-
Combination of human speech and music
-
Combination of effect sounds and music
-
Combination of human speech, effect sounds and music
The above types of all sounds will be very helpful at the time of re-recording for the effectiveness
of the film.
Sound Perception
Objective music : Showing one place with the help of music
Subjective music : human emotions showing with the help of music
Censor Copy
After completion of the film, every film maker has to prepare a censor copy for censor certification and it is to be submitted to the censor authorities. They verify the copy submitted and after completion of all the formalities and satisfied censor certificate to the film will be given.
The censor copy includes each and every scene number and shot number in order from first to end a description of the shot, time duration of the shot, footage of can used for the shot and total scenes, total time duration, total footage of can used.
Category of Films
-
Mythological Social
-
Folk, Fantasy
-
Mythological fantasy
-
Socio fantasy
-
Science fiction
-
Historical
-
Historical fantasy
-
ChildrenAnimal
-
Animation
As per Technique/Time/Purpose
Feature films: will be having story and includes all the commercial elements like Drama, emotions, fights, songs for entertainment.
Add films: are mainly for Publicity of different companies, Products, Organizations etc.
Tele films: are the films mainly shot for Television. Generally Video Cameras with magnetic tapes will be used for shot of these films.
Documentary films: are for description about Places, Persons, Festivals and Occasions etc.
Short films: are also the feature films but only difference is, duration of the film will be short.
Educational film: is meant for educating the different people in various subjects.
Online program: is the program which telecasts online
Teleplay: is the Stage Play which is shot while running by using single camera or multi cameras. There is no need of any editing for these Teleplays.
Tele episode: is also a tele film but only difference is time duration. These are two types. First one is the Single episode shows the total subject/story in one episode. Second one is the Serial shows the story/Subject in number of parts/episode for long duration like number of days.
News story: is the story of real incidents occurred and will be shot with Artists not at all related to the news. Sometimes, Interviews o0f the real characters related to the news will be included in the News story.
Docu drama: includes the real incidents occurred in the past and will be shot in original locations where those incidents occurred.
Children films: will be having the concepts related to Children for entertainment or encouraging or for conveying messages.
Animation Films: will be made by using different drawings/Cartoons and motion will be created by arranging number of drawings in sequence. Cartoon Films are also animated films.
| Classroom - Regular | ||||
| When | Duration | Where | Remarks | Price |
| Not Specified |
6 Months |
All Venues | Duration: 12 Months | Price On Request |
| Classroom - Weekend | ||||
| When | Duration | Where | Remarks | Price |
| Not Specified |
6 Months |
All Venues | Duration: 12 Month. | Price On Request |
Thane, Ghodbandar Road (Branch):- Mini Film City, Bamandev Compound, Near Hyper City Next to Swastik Hometown Kasarvadawali Ghodbandar Road, Thane - 400601, Maharashtra, India
Thane, Veer Savarkar Nagar (Branch):- Row House - Number 37 Veer Savarkar Nagar, Thane - 40006, Maharashtra, India
SRM Film School
SRM Film School is a Acting and film making training school with head office located at Four Bungalows, Andheri (West), Mumbai. SRM film School also has its branch in chinchwad Pune and Thane district. It provides courses in Film Acting, Film Direction, Film making, Editing and Scriptwriting. SRM Film School was established on Aug 1, 2001.
Our film school has developed serious and disciplined young artists who have made us proud in their respective fields in the film industry. Their talents are boundless, their expressions are illuminating, and their commitment to their own development is inspiring.
At SRM Film School, we have invested many years of creative growth, experience, and accomplishment to establish an environment where expansion of every student's expression can take place. We make a strong initial contact with all of our students. Our endeavor is to make each student feel that he or she belongs to this industry. Once this acceptance is established, we work through a series of imaginative story, games, and exercises that opens the door for our students to truly understand what it takes to excel in this highly competitive field and for them to polish upon their skills that give them the competitive edge over their peers.
In our energetic, unique and creative teaching environment, we encourage our students of all ages to explore the world around them, expressing their individual uniqueness, talent and feeling of self-worth in a safe environment.
We open the doors to you to share in our joy of each and every student who creates magic on an empty stage. Embrace your dream.
Our students not only learn acting with fun but also get opportunities that most others can just dream of. They get the opportunities to see live auditions, which are held in our own film school on regular basis. Watching live auditions give our students tremendous confidence and knowledge and make them feel at home when they themselves are part of it.
